Sessions 74 & 75 (7 & 21 August 2019)
Note to readers: This is a session re-cap of an ongoing D&D 5th edition campaign set in a loosely adapted version of N. Robin Crossby's Hârn. Previous session re-caps can be found on this blog, and an early journal of sessions 1 through 54, beginning in February 2015, is archived here.
In-world dates: 14 Ilvin 720 TR [second week of winter]
Daylight hours: 9
Moon: waxing crescent (full moon on 15 Ilvin)
The beholder introduces himself as Argaphrax to his new "friend" Gil'Doren as he leads the elf into the castle's dungeon. Because of the elf's telepathic bond with the other party members, however, you are aware of the danger he is in. A harsh telepathic ultimatum from Dracul forces Gil'Doren to confront the enchantment fogging his mind; wresting himself free of the beholder's charm spell, he flees back to the main floor, but not before lobbing a potent fireball in his bewitcher's direction.
Reunited in the main hall of the empty castle, you decide to track Argaphrax into the bowels of the castle where has has taken refuge. Making your way down stairs and into the damp gloom of the tunnels below the keep, you stumble across a room filled with implements of torture – and find you are not alone! Ghostly figures float through the room, emerging from walls and exiting the same way. On edge, perhaps, Cade unleashes a fiery attack at the phantoms. They respond by rushing toward you – and into you! Several of you are possessed and begin attacking your comrades, albeit with considerable clumsiness. It might have been comic were it not for the very real inter-party stabbing that unfolds for a few desperate moments. Fortunately, Maslorius is able to keep some of the ghosts at bay with his holy symbol and engage them in dialog. They are, it turns out, the restless spirits of long-dead victims of the earls of Minarsis, Caldeth's ancestors, who have long maintained their rule over these lands through the ruthless suppression of their political opponents and their families. They will not be at rest until their tormentor is destroyed. Said tormentor is not Caldeth, however: it is one of his ancestors, Lord Carmac, who ruled the fief several hundred years ago. Alarmingly, the ghosts reveal that Lord Carmac is still around: they are bound not to disturb him or his minions, Argaphrax included.
Further searching reveals a passage with several prison cells in it. There is a living occupant in one: a woman who identifies herself as Izdrel. She is an agent of Countess Curo, sent to investigate Caldeth's nefarious dealings. Discovered and imprisoned by Argaphrax shortly after infiltrating the keep, she has bided her time. Her gaolers are nearby as well: two wretched humans, one evidently specialized in interrogation. They have been fear-stricken and hiding in a room ever since Gil'Doren's fireball. It's one thing to torment prisoners taken by Argaphrax, but quite another to confront determined and powerful adventurers. Despite your threats, they provide little information: clearly they fear Lord Carmac more than they do you! They do, however, reveal where Izdrel's gear has been stowed. Re-equipped, she vows to assist the party in pursuing your common objective: find evidence of Caldeth's evildoing.
A scribe's room nearby contains what you seek: the records of the gaol. Going back centuries, these scrolls and registers detail the names of the political prisoners seized by a succession of earls and the results of their brutal interrogations. The most recent register documents the current earl's detainment and persecution of several loyal supporters and even officials of the king – irrefutable evidence of Caldeth's unlawful acts. You now have what you need, but you are moved to pity by the deathless plight of the ghosts; you decide to free them from undeath by destroying Lord Carmac.
The hunt is brief. Alerted to your presence by Argaphrax and several shadowy demons who pass easily through the dungeon's walls, Lord Carmac awaits you, confident that he will easily snuff out your lives as he has so many others. Once again, Maslorius saves your bacon by holding Lord Carmac at bay with his holy symbol, giving you the opportunity to defeat the beholder and the demons before turning to the skeletal knight himself. It's not an easy battle, and poor Maslorius is blasted near to death by the wicked creature's hellfire before your blades and spells bring it down. Dracul gets the killing blow, severing Carmac's tether to this world for the time being.
Your task now: to get the incriminating information back to Countess Curo in Tashal. Other questions arise, however: what will you do with Lady Philisia? Is she complicit in her husband's crimes? And what of the infant Quilian? Who, if anyone, will govern Minarsis until order is restored? And how was Carmac connected to Caldeth's plots and the conspiracy behind the Giant uprisings across Harn?
In-world dates: 14 Ilvin 720 TR [second week of winter]
Daylight hours: 9
Moon: waxing crescent (full moon on 15 Ilvin)
The beholder introduces himself as Argaphrax to his new "friend" Gil'Doren as he leads the elf into the castle's dungeon. Because of the elf's telepathic bond with the other party members, however, you are aware of the danger he is in. A harsh telepathic ultimatum from Dracul forces Gil'Doren to confront the enchantment fogging his mind; wresting himself free of the beholder's charm spell, he flees back to the main floor, but not before lobbing a potent fireball in his bewitcher's direction.
Reunited in the main hall of the empty castle, you decide to track Argaphrax into the bowels of the castle where has has taken refuge. Making your way down stairs and into the damp gloom of the tunnels below the keep, you stumble across a room filled with implements of torture – and find you are not alone! Ghostly figures float through the room, emerging from walls and exiting the same way. On edge, perhaps, Cade unleashes a fiery attack at the phantoms. They respond by rushing toward you – and into you! Several of you are possessed and begin attacking your comrades, albeit with considerable clumsiness. It might have been comic were it not for the very real inter-party stabbing that unfolds for a few desperate moments. Fortunately, Maslorius is able to keep some of the ghosts at bay with his holy symbol and engage them in dialog. They are, it turns out, the restless spirits of long-dead victims of the earls of Minarsis, Caldeth's ancestors, who have long maintained their rule over these lands through the ruthless suppression of their political opponents and their families. They will not be at rest until their tormentor is destroyed. Said tormentor is not Caldeth, however: it is one of his ancestors, Lord Carmac, who ruled the fief several hundred years ago. Alarmingly, the ghosts reveal that Lord Carmac is still around: they are bound not to disturb him or his minions, Argaphrax included.
Further searching reveals a passage with several prison cells in it. There is a living occupant in one: a woman who identifies herself as Izdrel. She is an agent of Countess Curo, sent to investigate Caldeth's nefarious dealings. Discovered and imprisoned by Argaphrax shortly after infiltrating the keep, she has bided her time. Her gaolers are nearby as well: two wretched humans, one evidently specialized in interrogation. They have been fear-stricken and hiding in a room ever since Gil'Doren's fireball. It's one thing to torment prisoners taken by Argaphrax, but quite another to confront determined and powerful adventurers. Despite your threats, they provide little information: clearly they fear Lord Carmac more than they do you! They do, however, reveal where Izdrel's gear has been stowed. Re-equipped, she vows to assist the party in pursuing your common objective: find evidence of Caldeth's evildoing.
A scribe's room nearby contains what you seek: the records of the gaol. Going back centuries, these scrolls and registers detail the names of the political prisoners seized by a succession of earls and the results of their brutal interrogations. The most recent register documents the current earl's detainment and persecution of several loyal supporters and even officials of the king – irrefutable evidence of Caldeth's unlawful acts. You now have what you need, but you are moved to pity by the deathless plight of the ghosts; you decide to free them from undeath by destroying Lord Carmac.
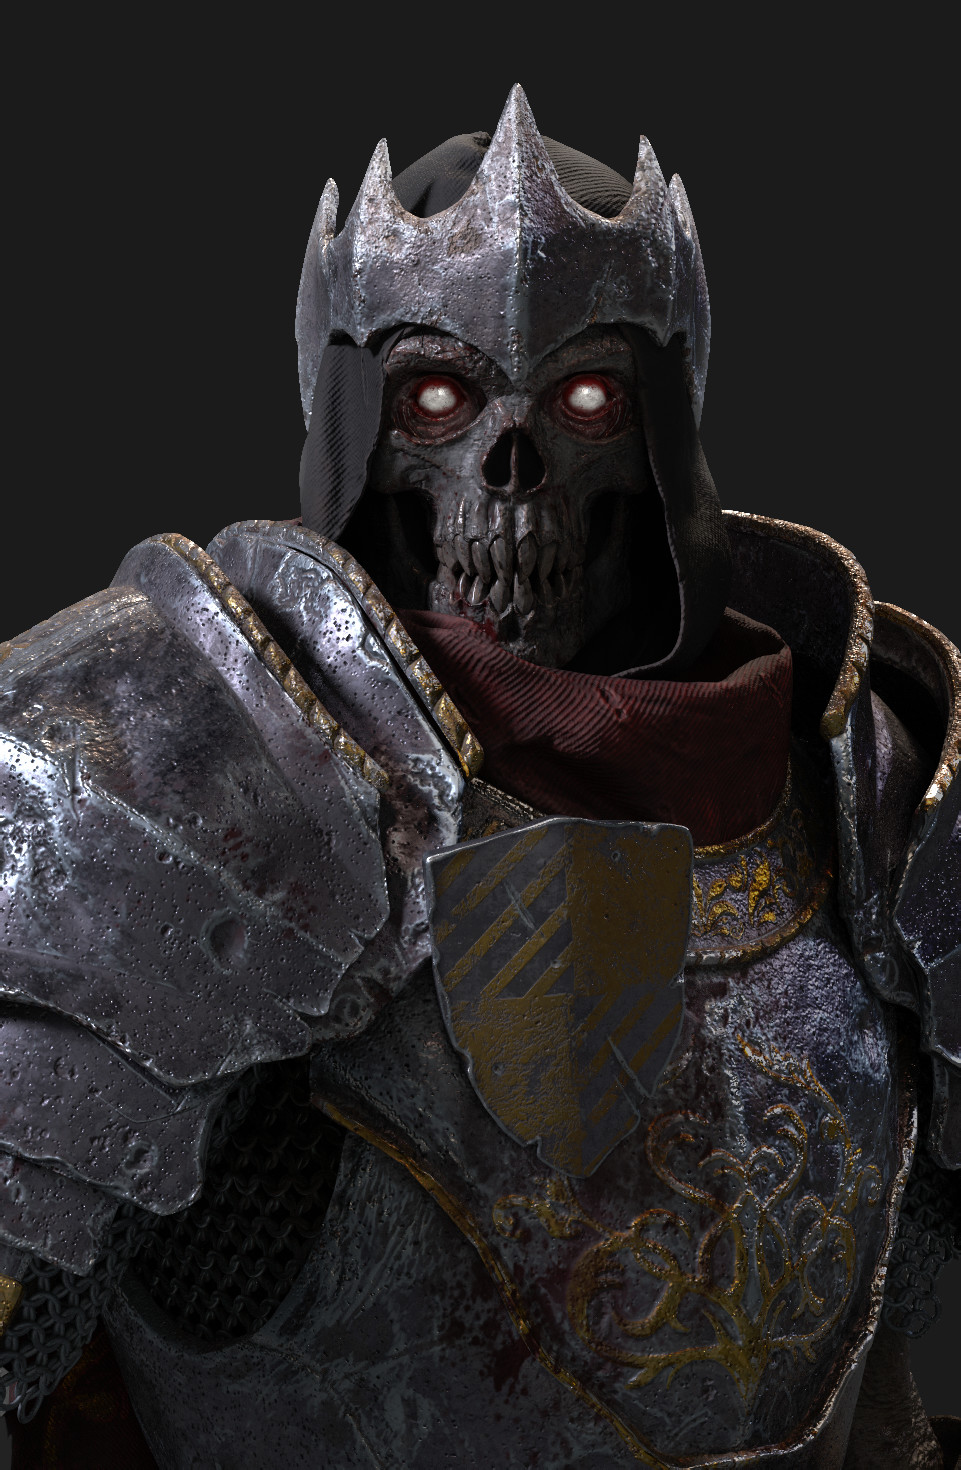 |
| Lord Carmac Credit: Maciej Mikolajczyk |
Your task now: to get the incriminating information back to Countess Curo in Tashal. Other questions arise, however: what will you do with Lady Philisia? Is she complicit in her husband's crimes? And what of the infant Quilian? Who, if anyone, will govern Minarsis until order is restored? And how was Carmac connected to Caldeth's plots and the conspiracy behind the Giant uprisings across Harn?
Comments